App Store Screenshot Optimization: A Practical Guide
Optimize App Store screenshots with an intent brief, a first-three-image story, current Apple specifications, localization, and a controlled product page test.

App Store screenshot optimization is the process of choosing, ordering, writing, localizing, and testing product images so people understand the app and decide whether to download it.
The practical rule is simple: treat the first three screenshots as a small landing page. Lead with the outcome, prove it with real product UI, and show why this app is a credible answer to the visitor's intent. Then use the rest of the gallery for the workflow, differentiation, trust, and secondary jobs.
Apple allows up to ten screenshots, but ten weak images do not beat three clear ones.
What screenshots can and cannot do for ASO
Screenshots influence how a listing communicates in search results and on the product page. Apple says the first one to three images can appear in search results when no app preview is available, depending on their orientation. The gallery can therefore shape both the decision to open the page and the decision to download.
Screenshots are not a replacement for search metadata. Apple's current discoverability guidance names title, keyword metadata, and primary category as text-relevance inputs. It does not list words drawn inside screenshot images as keyword metadata.
Use the two systems together:
| ASO job | Main inputs |
|---|---|
| Become eligible and relevant for a search | App name, subtitle and other product-page metadata, keyword field, category, product fit |
| Make the result understandable | Icon, name, subtitle, rating, visible screenshots or preview |
| Turn the visit into a download | Full screenshot story, preview, description, ratings, offer, and product proof |
| Turn the download into value | Onboarding, activation, trial, purchase, retention, and product quality |
The App Store ranking guide covers search visibility. This guide owns the visual-conversion layer.
1. Save a baseline before redesigning
Do not begin in Figma. Begin in App Store Connect Analytics.
Record a consistent period for:
- Impressions and unique-device impressions.
- Product page views and unique-device product page views.
- First-time and total downloads.
- Apple's conversion rate.
- Territory, device, and acquisition source.
- Activation, trial, purchase, proceeds, or retained revenue in your product analytics.
Apple currently defines App Store conversion rate as total downloads and pre-orders divided by unique-device impressions. It is not page views divided by downloads.
For diagnosis, you can add two clearly labeled internal ratios:
- Page-view rate: unique product page views divided by unique impressions.
- Page-to-download rate: first-time downloads divided by unique product page views.
Those are your calculations, not Apple's named Conversion Rate metric. They help separate a search-result problem from a product-page problem, but direct downloads and other App Store paths mean they are not a perfect funnel.
Keep the same territory, source, and device filters before and after a change. A global average can improve simply because the traffic mix changed.
2. Choose one primary intent
A screenshot set needs a viewer and a job.
Write this one-sentence brief:
A [type of person] arrives while trying to [job]. The app helps by [mechanism], and the first useful in-app event is [proof].
For a running app:
A beginner arrives while trying to prepare for a first 5K. The app builds a week-by-week plan from their race date and ability, and the first useful event is creating the plan.
This is more actionable than “show the running features.” It tells you which benefit leads, which screen proves it, and which downstream event should improve if the promise is honest.
Use keyword research, Apple Ads search terms, reviews, onboarding responses, and support conversations to choose the language. Do not paste a keyword into every frame. Translate the intent into a coherent promise.
3. Give the first three screenshots separate jobs
Apple recommends that the first images highlight the essence of the app and that later screenshots focus on main benefits or features. A useful first-three structure is:
- Outcome: What can the person accomplish?
- Proof: What real product state demonstrates that outcome?
- Difference: Why is this workflow especially useful or easier here?
For the 5K example:
| Slot | Caption | UI proof |
|---|---|---|
| 1 — Outcome | Your first 5K, planned week by week | The generated training calendar |
| 2 — Mechanism | Built around your race date | The compact plan setup screen |
| 3 — Daily value | Know exactly what to run today | The current workout with pace and distance |
Read the three captions without the images. They should form one short argument. Then hide the captions. The UI should still make each claim believable.
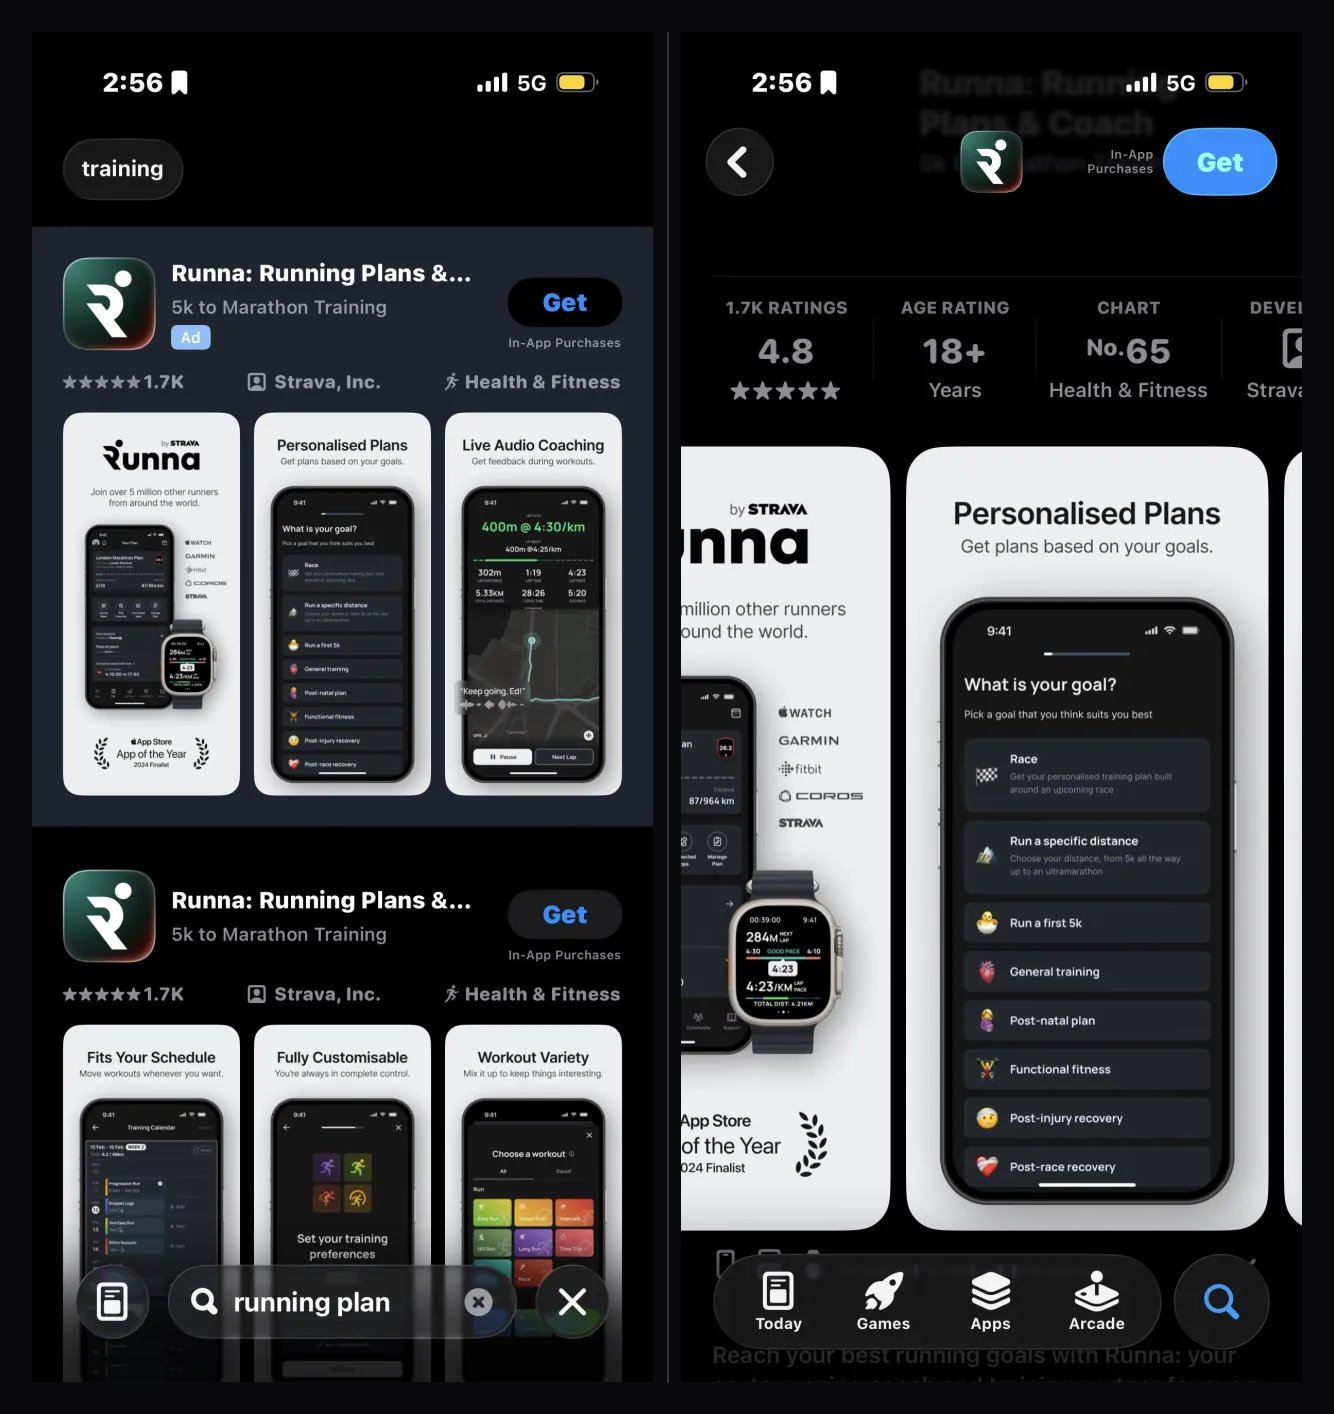
4. Show the product at its moment of value
Apple asks developers to use images captured from the app's UI to communicate the user experience. Show the product doing the thing the caption promises.
Prefer:
- A completed plan over an empty planner.
- A real progress chart over a blank dashboard.
- A populated budget over a category setup screen.
- A finished edit over a toolbar with no result.
- A lesson result over a generic course catalog.
Use realistic sample data that a customer can understand. Avoid personal information, impossible results, and claims the screen does not support.
Decorative backgrounds and device frames can establish hierarchy, but they should not shrink the product until the meaningful detail disappears. If the proof is a small chart label, crop closer or choose a stronger state.
5. Write captions as conversion copy
A screenshot caption should help someone understand the image at the size where it will actually be seen.
Good captions usually do one of three things:
- Name an outcome: “Plan your week in minutes.”
- Explain a mechanism: “A budget that updates as you spend.”
- Supply a differentiator: “Every workout adapts to your progress.”
Avoid claims such as “best,” “number one,” or “guaranteed” unless you have durable evidence and the wording complies with App Review rules. Avoid vague praise—“simple,” “powerful,” “beautiful”—when the image can make a more specific promise.
Use the audience's language, but do not treat captions as a hidden keyword field. The goal is recognition, not repetition.
Test the export on a physical phone or at actual App Store display size. A line that feels restrained on a desktop canvas can become unreadable on the result page.
6. Choose orientation and files from the store context
There is no universal portrait rule. The product experience, optional app preview, platform, and intended browsing layout all matter.
Before committing:
- Search the target query in the intended storefront.
- Note whether screenshots or previews are visible in the result.
- Compare portrait and landscape at real display size.
- Confirm that the primary UI can be shown honestly in that orientation.
- Preview every supported device family rather than assuming one export covers all contexts.
Apple currently requires one to ten screenshots in JPEG, JPG, or PNG format. The exact pixel dimensions depend on platform and device size, so use Apple's live screenshot specification table as the source of truth.
If the UI is the same across device sizes and localizations, Apple lets you provide only the highest required resolution and scales it down. If the experience differs, use Media Manager to upload device-specific assets.
Remember that app previews precede screenshots on supported product pages. If a preview exists, its first seconds and poster frame become part of the same visual system.
7. Make the gallery feel related without making it repetitive
Consistency reduces the effort required to understand the page. Repetition wastes slots.
Keep these stable:
- Caption position and typographic hierarchy.
- Background and product-crop logic.
- Device-frame treatment.
- Spacing and safe margins.
- Brand colors and contrast.
Change the job of each frame. After the first-three argument, later screenshots can cover:
- A second high-value workflow.
- Personalization.
- Progress or saved history.
- Collaboration or sharing.
- Privacy, offline use, or another meaningful differentiator.
- A feature required to remove a common objection.
Do not assign one screenshot to every navigation tab. Organize around reasons to download, not around the app's information architecture.
8. Localize the promise, not only the words
Apple recommends localizing screenshots and previews for each market where the app is offered.
For every selected storefront, check:
- Whether the leading job is the same.
- Whether the caption still fits after translation.
- Whether dates, currency, units, maps, and sample names feel local.
- Whether the feature and offer are available there.
- Whether the UI language matches the caption.
- Whether the text remains readable after expansion.
Translation can preserve grammar while losing the buying reason. A finance app might lead with subscription tracking in one market and household budgeting in another. Use local query and conversion evidence before changing the visual hierarchy.
The App Store localization guide covers market selection and metadata coordination in more depth.
9. Use the right product-page feature
Default screenshots, Product Page Optimization, and custom product pages solve different problems.
| Feature | Use it when |
|---|---|
| Default product page | You need the strongest general story for the app's main audience |
| Product Page Optimization | You want a controlled comparison of alternate icons, screenshots, or previews against the default page |
| Custom product page | A distinct audience, feature, campaign, or search intent deserves its own page and URL |
Do not force five unrelated search jobs into the default gallery. Keep the default page coherent, then use a custom product page for an intent that is valuable and meaningfully different.
Product Page Optimization tests are not available for custom product pages. If the question is “which general screenshot sequence converts better?”, use a default-page test. If the question is “what should a 5K-plan visitor see?”, build the intent-specific page and measure that path.
10. Run a controlled Product Page Optimization test
Apple lets you create up to three treatments per test. You choose the share of traffic shown a treatment and the localizations included. More treatments divide the traffic and can take longer to reach a conclusion.
For a readable screenshot test:
- Pick one hypothesis, such as “an outcome-led first frame will outperform the dashboard-led control.”
- Change only the first frame, or one clearly defined sequence.
- Select the storefronts where the promise and assets mean the same thing.
- Use Apple's duration estimate before starting.
- Keep unrelated metadata, pricing, and product launches out of the window when possible.
- Submit new treatment assets for approval.
- Let the test collect enough evidence before choosing a winner.
Reordering screenshots already approved on the store does not require another metadata submission. New assets do.
Apple runs a test for up to 90 days unless you stop it earlier. Results appear after at least five first-time downloads are attributed to the test. The current Analytics experience reports estimated conversion, relative lift, a credible interval, and confidence; at 90% confidence, a treatment may be labeled Performing Better or Performing Worse.
Do not stop after the first favorable swing. Small apps may receive a Likely to be Inconclusive result because the expected lift is too small for the available traffic. In that case, test a more meaningful creative difference, reduce the number of treatments, narrow to a stronger market, or wait for a period with enough traffic.
Read the result without fooling yourself
Use the test result for the tested conversion question, then check downstream quality.
| Result | Interpretation | Next move |
|---|---|---|
| Conversion and first-time downloads improve; downstream value holds | The new story likely removes friction without weakening acquisition quality | Apply the treatment and test the next bottleneck |
| Product-page behavior improves; activation or paid conversion falls | The creative may attract the wrong expectation | Align the promise with onboarding and product value |
| No meaningful difference with adequate evidence | The changed element may not matter enough | Test a larger contrast or another bottleneck |
| Likely inconclusive with low traffic | The experiment cannot resolve a small effect in time | Use fewer treatments or prioritize a higher-volume market |
| One territory wins and another loses | The shared creative is hiding local intent | Split the localization strategy |
If you also changed the app, price, acquisition mix, or metadata, record that limitation. A dashboard can show movement without proving the screenshot caused it.
The ASO performance guide shows how to connect product-page metrics with rank and acquisition changes.
Screenshot production checklist
Before uploading:
- The target audience and job fit in one sentence.
- Screenshot one names the main outcome.
- The first three frames form one argument.
- Every claim is supported by visible product UI.
- Sample data is realistic and safe to publish.
- Captions remain readable at App Store size.
- Each later frame adds a new reason to download.
- App preview order and poster frame are considered.
- Device sizes match Apple's current specification table.
- Localizations use appropriate copy, UI, units, and examples.
- The old assets and baseline metrics are archived.
- The test changes one interpretable idea.
- Activation, trial, purchase, or revenue quality will be checked after the App Store result.
Use AppSprint keyword research to find the search jobs and competing product pages worth studying. Then make the screenshots prove the product—not merely repeat the keyword.
Sources
- Apple: Creating your product page - Current screenshot count, search-result appearance, app previews, localization, Product Page Optimization, and custom product pages
- Apple: Screenshot specifications - Current pixel dimensions and platform requirements
- Apple: Upload app previews and screenshots - Current formats, scaling, Media Manager, preview order, upload workflow, and update requirement
- Apple: App Store discoverability - Current search relevance and customer-behavior inputs
- Apple: Create a Product Page Optimization test - Current treatment count, traffic allocation, localizations, and duration estimate
- Apple: Configure test treatments - Current editable assets, approval behavior, and default-page limitations
- Apple: Run a Product Page Optimization test - Current review dependency, 90-day window, five-download threshold, and stop behavior
- Apple: Product Page Optimization analytics - Current conversion, lift, confidence, credible interval, and inconclusive-result interpretation
- Apple: Analytics metric definitions - Current impressions, product page views, conversion rate, and download definitions
Research, analyze, optimize
Find the right keywords, study the competitors already earning attention, and turn that into a stronger App Store page.
Available for macOS 14.6 and above


Loved by 544 users
Related articles
See all posts →
App Store Rank Tracking After a Metadata Update
Track keyword rankings before and after an App Store metadata update, separate visibility from conversion, and decide what to keep or change next.

How to Find Your Competitors' App Store Keywords
Find competitors' App Store keywords from public rankings, metadata, result pages, and country gaps, then turn the evidence into a focused ASO test.
How to Recover From an App Store Ranking Drop
Diagnose an App Store keyword ranking drop, separate metadata problems from market movement, and choose the safest recovery action.